Earthen Flooring
The earthen floor feels gentler to your bones and natural to your feet as if you were walking in the out-of-doors
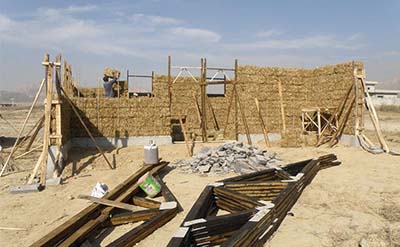
For most of human history, people have lived in durable, comfortable buildings made from natural materials such as soil, sand, rocks, and fiber. All over the globe, these ancient traditions persist; a quarter to a third of the world’s population today lives in houses built partially or entirely of earth. Conventional Western building techniques using industrial materials may save time and create efficiencies, but these perceived savings come at a considerable financial and environmental cost.
Earthen floors add a great earthy touch to your sustainable home; whether that’s in your cob house or conventional stick frame home. They have more give than concrete or tile, meaning they are more comfortable and easier on your feet. Earthen floors can be durable and last a long time.
An earthen floor can be comprised of 5 different layers
- Waterproof membrane
- Tamped gravel (optional to increase total depth,)
- Compacted road base (mixture of sand, clay, and gravel)
- Two layers of the final floor (mixture of sand, clay, and chopped straw)
- Sealing Layers


Preparation of Floor:
The floor has to rest on solid ground. If you have movement below, the floor will crack. So, you want strong, compacted earth to build on, free of topsoil or organic matter, since it will continue to decompose and shrink in volume over time, leaving you with voids below your floor. The floor should be free from cracks so that no leakage or seepage could occur. You can prepare your ground according to the floor type you are using. If you are using lime-based plaster for flooring, you should have lime base concrete which acts in the same way as PCC. But if you are using earthen plaster, you can use lime base concrete to build a solid ground but it is preferable to use earthen material such as compacted road base and a layer of gravel as solid ground.
Types of Earth Flooring:
There are various types of Earthen floors depending upon the site conditions. You can use a different kind of floor for different types of structures such as toilets and living rooms. Lime-based plasters are becoming more common these days. Lime is not a natural material but it is cheap and emits a negligible amount of carbon. Also, when placed, it absorbs carbon dioxide from the atmosphere, thus contributing to a sustainable and eco-friendly environment.
- Lime Mud Floor:
First of all, Slaked lime is prepared. Slaked lime is a little bit different than ordinary lime. Mud is screened and the lime mud plaster is prepared in the ratio of 1:3:1 with 1-part slaked lime,3-part mud, and 1 part straw bale.1:3:1 is the dry mixing ratio. They are mixed with water. The consistency of this type of mixture is a little bit more compared to the cob.The Lime mud floor is done with two coats. Basecoat and final coat. A base coat of 1.5” lime mud plaster is laid and then allowed to dry. After drying it for a day, sprinkle some water on the base coat and lay a final coat of 1.5” lime mud plaster. After the final coat, it is dried for a day and then cured for a week before applying the sealing coat. The detail of the sealing coat will be discussed in later sections. Lime mud floor is usually laid on lime concrete. Lime concrete of ratio 1:3:6 (1-part slaked lime,3 parts clay, and 6 parts sand) acts as a PCC floor for lime mud floor.Lime mud floor can also be done on a road base or compacted earth but it works best with the lime concrete - Lime and Pozzolana (Brick dust) floor:
This type of flooring system is used in washrooms, kitchens, and where there is a water leakage issue. The floor is laid in the slop where there is a drainage pipe. The floor is laid on either lime base concrete or gravels layers. Special care is required for the flooring of bathrooms. Brick dust or brick powder usually called pozzolana can be obtained from a brick kiln. Brick dust, lime, and mud are mixed in the ratio of 1:1:4(1 part brick powder,1-part slaked lime,4-part mud) with the water and are mixed thoroughly. The base coat of this type of floor can be of mud lime plaster or lime pozzolana plaster but the finish coat must be of lime pozzolana plaster. - Mud Earthen Floor:
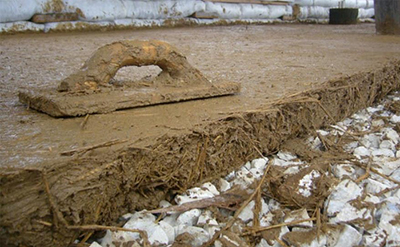
Mud Earthen floors are a simple combination of clay, sand, straw, and sometimes manure. Typically, the ratios are about 15-20% clay and 80-85% sand. Straw is thrown in to provide tensile strength and to reduce cracking. With each new clay, we spend many hours evaluating and testing recipes to ensure that we get a good, strong mix. A simple jar test can be done to evaluate the clay content. Clays vary from place to place, ranging from browns and yellows to reds and greens. Most often it is the color of the clay that determines the color of the floor Most earthen floors are often laid over the top of a subfloor of tamped gravel or cob or adobe, and then a mixture of clay, sand, and fiber are mixed and leveled onto the subfloor. The finished layer can be 1/2 to 2 inches thick, and once dry is sealed with drying oil.
Sealing Coats
Sealing coats are applied after the earthen floor/plaster has dried. A drying oil like linseed oil is usually used to seal the floor and protect it from wear and tear. A final coat of wax sealing finish (perilla oil or floor wax) can be used to increase durability. The oil is absorbed by the dry earth mix and polymerizes as it dries, binding the earth together and making a hard and water-resistant layer on top. Oil can be applied with a brush, a paint roller, or rags.
Boiled linseed oil is applied in coats. Boil your linseed oil and starts applying it to the floor. If there are cracks on the floor they need to be repaired first. Apply first coat of linseed oil and dry it for 7 days.

After 7 days apply another coat and let it dry. You can apply as many coats as you want. Usually, 2 or 3 coats are enough. It will waterproof the floor and provide a good finishing look and feel. The first two coats have to be applied with pure linseed oil. Other coats can be applied by mixing it suitable solvent. Do not leave any puddled oil on the floor; clean it up with a clean rag.
Once the oil has cured, the floor is ready for use. At this point, some additional optional finishing steps can make the floor even smoother and shinier. Many choose to apply a floor wax for added durability and shine. The recommended waxes are fairly liquid and can be applied with a brush or rag. After drying, the floor should be buffed with an electric buffer to remove excess wax. Another optional step is to lightly sand the floor after the oil has cured and before waxing. This leaves a smoother finish.
Earthen Flooring – Download PDF
Earthen Flooring (Whitepaper Explained in Urdu/Hindi) – Youtube Video