Building with COB
One of the Oldest Construction Technique – yet can fulfill Human Housing Requirements
Cob is a mixture of natural ingredients such as Sand, Clay, straw, and water. They are mixed in some suitable proportion and then placed such that the whole unit act as a single unit. In the cob mixture, Soil acts as a compression member, and straw behaves like a tensile member. A cob building is any building that has walls made of cob material.
Soil from the earth has proven to be a very suitable and successful building material throughout the world climates because of its ability to regulate indoor temperatures. Earth is a poor conductor of heat, has low thermal conductivity, and has high thermal mass. If you ever experience an earthen building, you will feel a dramatic difference between the inside of an earthen dwelling and a wooden one. For example, on hot days the wood building will feel miserable to be inside if there is no air conditioning running. An earthen building will feel cool and comfortable inside on the same days with no air conditioning. This is a result of the thermal mass of thick earthen walls.

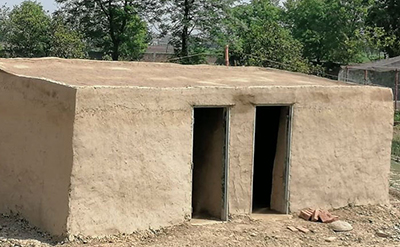
Cob is used as a building material for centuries due to its thermal insulation. It has very high thermal insulation due to its thick wall (18-24”) which makes cob structures cold during summers and heated during winters. This picture is taken after the finishing of our project in Lahore.
Materials Required
The material required for this type of construction is not going to cost you a fortune. It’s just present beneath your feet. We just need the sense and awareness to see them as construction material. Soil is used as the main construction material for this. You just need to buy a couple of things from the market to build your shelter. The materials required for this type of construction are Sand, Clay, water, and straw. The details of these materials are given below:

1- Earth (Soil):
Soil for cob is generally easy to find in abundance and can generally be found all around the world. One good way to acquire the soil you need is to use what’s excavated from your foundation trenches. One of the main guidelines for choosing sand for your cob mixture is to use rough and coarse sand that has many different particle sizes included in it. Rough-edged sand helps the particles to lock together better and will prevent serious cracking The clay is a binder and its purpose is to hold the sand (aggregate) together. Something important to understand is that clay expands when it’s made wet and it contracts when it’s dried out. This is why you can’t build a house out of pure clay. It needs the aggregate and straw fibers to give it stability and to prevent cracking.
2- Straw
It acts as natural rebar in a similar way that metal rebar would function in concrete. It adds tensile and shear strength to cob walls and holds a cob structure more together as a single monolithic piece. Use straw that is fresh and not brittle or rotten. Make sure that it has been kept dry before purchasing it too. Sometimes a bale of straw might look okay on the outside, but it’s a good idea to examine some of the stock for mold or mildew by opening up a bale to see the inside portions. Look for bales of straw that have long strands. Six to twelve inches is an appropriate length. If it’s too short you are losing out on the benefits of this ingredient for cob.


3- Water
Water is the final ingredient that you will need for making cob. There’s nothing particularly special about the kind of water that you use though. If you’re getting it from your water lines then you have nothing to worry about. But if you’re collecting it from a pond or open body of water then perhaps just make sure that you remove any leaves or other organic matter from it first.
Mixing Ratio of Materials
Cob can be made from the soil present on your construction site. Almost all of the materials which are required to make cob can be found on-site or can be bought cheaply from anywhere around the world The mixing ratio of materials suitable in clayey soils is:
- 60-70 % Sand
- 20-30 % Clay
- Some straws (Having Long fibers)
How to make a COB House
Cob structures are constructed in layers. Each layer is built, set to dry, and then the next layer is built on top of that. There are typically no forms used to build walls with this method either. The cob is simply laid, compacted with hands or feet, and trimmed to the desired shape. The step-by-step guide to build your own cob house is discussed below. Following these steps carefully, you can make your own cob house with your own barehand with the help of a few friends or you can hire professionals to do it for you.
Step 1: Preparation of site and layout of building:
Clean the site. There should be no grass, plants on the earth. Also, when you make a cob, don’t use the topsoil material as it contains a lot of impurities. The mixture should be free from glass plastic large stones, small pieces of wood, roots, etc. Also, compress the site if necessary to avoid settlement in the future. Compressing on loose soil is mandatory Once the site is cleaned the next step is to make a layout of your building. Layout simply means transferring the walls from plan to site. Take a limestone powder and place it where your walls are going to be on the ground.
Step 2: Foundation:
The foundations are the first and foremost important thing in any kind of structure. Usually, the trench foundations are employed for the cob foundations, the details of which will be discussed in a later section. The foundations include digging of earth, filling it with foundations materials, and sometimes stem wall also in case of trench foundations. The foundations of cob structures can be one of the following depending upon the type of subsoil.
1- Trench Foundations:
This type of foundation consists of making a trench of 2ft by 2ft beneath the walls of your structures and then adding gravel in 3 layers of 8”. Each layer is compacted before placing of next layer. The Foundation trench is made on such a slope that water should flow out of the building. When you had built a trench, take a bucket of water and test your trench. After 3 layers of gravel, we have reached almost ground level. A 1.5ft stem wall is constructed to stop the water from entering the walls.


2- Concrete Foundation:
Concrete is a really good building material consisting of natural materials such as clay sand and aggregates. If the soil beneath your structure is of very poor quality and there are a lot of big-sized pebbles or stones are in it, then you can also use a concrete foundation. The typical cross-section for a concrete foundation is shown in the figure. Foundations for cob buildings can include the footers below ground and the above-ground stem wall that holds the cob walls above grade. The footers below ground level work with the stem wall to further distribute the weight of the building evenly and to anchor the building into the ground. The stem wall, which extends above ground on top of the footers, stands at least 1 ½ feet above ground level. The stem wall acts as protection for the earthen walls from water damage. It acts as a moisture break so that water does not seep up from the ground into the walls. Water runoff along the ground is also not able to touch the cob portion of the walls, and water splash-back from rainfall cannot reach the height of the cob walls.
Step 3: Preparation and mixing of Cob:
Once your foundations are laid out, the next step is the preparation of Cob itself. The materials required to make a cob are sand, clay, straw, and water. The important part of cob is getting the mix right, you want roughly between 2 parts sand, 1 part clay, a sprinkling of straw, and a little water. To mix these the favorite method is with your bare feet with the tarp. Organize all of your materials and tools close to your building site. Soil, aggregate, straw, water, tarp, and buckets. Layout your tarp in a flat space. This is where you’ll be mixing. Since you will likely be mixing with bare feet, make sure that any sticks or rocks are out from underneath the tarp since these will hurt to step on. Put your dry ingredients (subsoil and aggregate) in the middle of your tarp in a pile in accordance with the cob ratio that you have decided to use. Here is an example of the mixing of cob. It’s better to put a tarp under the materials to minimize wastage.


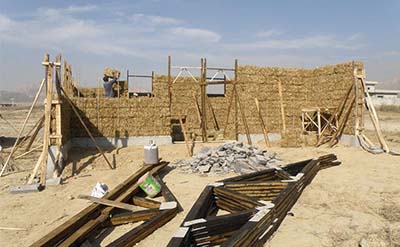
Step 4: Building of Cob walls:
When your foundation is completed, you can begin to build the cob walls. They will sit directly on top of the foundations. The walls in a cob house are super thick, which is what gives its strength. Your walls will be thicker at the base and get thinner as they rise. At the top, your walls might be around 18 inches, but your cob wall at the base will be 24 inches. As you build, poke holes in the top of the wall to allow you to integrate the next layer into the bottom layer, and generally you can only build your wall 2-3 feet vertically at a time before you’re going to want to let it sit and dry some. This is an important step and is what takes so much time with cob. Allowing it to dry will make sure the wall doesn’t slump over. When you are done with one layer of cob, make a key type arrangement so that the next layer fill carve in the previous layer, and the whole wall will act as a monolithic. Each layer does not have to dry completely before you can add the next layer. Generally, you can apply one layer, let it sit overnight, and then apply the next layer the following morning.
Step 5: Windows, Ventilator, and Door frame:
Place the wooden door and window frames where you want to have the windows and doors and then build your cob walls around them. This is as simple as that. You can also have a solid timber act as the header for the span of the top of the window or door. Have a big piece of wood at least 6 inches thick and go for as wide as the wall. For placing the ventilator, always try to place the ventilator at the top of the wall. In this way, they will not need any support and no frame will be required. The roof will act as a lintel to them.
Step 6: Roofing:
The roof can be made from a wooden frame or can consist of bamboo acting as rebars. A lightweight steel roof consisting of steel panels can also be used. The bamboo roof is cheap, natural, renewable, and gives almost performance as a steel roof.
- Wooden Frame Roof:
The wooden frame roof is employed for this purpose. The typical timber roof is made of wooden beams, poles and rubber membrane, etc. The typical cross-section of this type of roofing system is shown in the figure. A central beam along with different purlins are placed and are joined with joints or bolts. The roof of cob houses should extend beyond the walls of the house by 2 ft on every side. This is done so that rain cannot hit directly on the walls of Cob. Sometimes bond beam is also placed. This is common if you have used concrete foundations. Keep the roof as lightweight as possible but not so that it should be blown off by wind or storm. A roof should be designed keeping in view the highest storm of that particular area. - Bamboo Roof:
This type of roofing system is common in rural areas of Pakistan and India and they serve the purpose of the roof very well. You don’t need a bond beam in this type of roof. An arrangement of bamboos and reed grass is set up on the walls. The bamboos are placed in the short direction or longer direction or both and reed grass is placed in larger directions. A plastic sheet is placed on the whole roof and then plastering is done on the outer side of the roof. Plastering with the mixture of mud and water on the roof This is the type of Roof system we adopted for our project in Lahore.
Step 7: Plastering:
Plastering is optional. Usually, the cob provides a fine finish to the walls and there is no need for plastering either inside or outside of the structure. But if you are in a region where rains are excessive, you might want to do the plastering or some epoxy finish. We used limestone to plaster our walls.
Step 8: Flooring:
Nobody wants to lay their feet on the uneven surface. The floor of unfinished cob rooms or buildings is just as same as the floor outside the building. So, we need to provide some kind of finishing to give it a proper surface. The ground is compacted a little bit and then plaster is applied on the ground. This plaster is done with a mixture of fine clay and water. After plastering, the surface is coated with linseed oil.
Trench Foundation – Rubble trench foundation for a Cob Building – Youtube Video
Concrete Foundation – Understanding Foundation Construction – Youtube Video
Wooden Frame Roof – How to build & attach roofing on COB House – Youtube Video
Building with COB – Download PDF
Building with COB (Explained in Urdu/Hindi) – Youtube Video